Good morning! I hope that you are enjoying my guest blogger’s week! I had fun sharing new blogs with you. Today’s guest is a friend of mine named Jennifer! She is a sweet mom-to-be who loves taking care of her home, her body and her hubby! She is so excited to meet her little guy this fall!
Meet Jennifer…
Hey there!! My name is Jennifer and I am the author behind {Blissfully Ever After}.
Bonnie has been sweet enough to allow me to be a guest blogger today and I am so excited to share my bathroom remodel with you! Thanks, Bonnie!!

To kick the New Year off to a great start, my Hubby and I decided to tackle our main bath redo that we had been wanting to complete since we moved into our house 3 years ago. This was no easy task….so don’t be fooled by these pics =)
{p.s. we had no clue at this point that I was pregnant, and we are so happy that we were able to get this bathroom done before the baby arrives. He will like the bath tub, don’t ya think?!}
This redo costs us under $1,000 for a completely gutted {well almost} and remodeled bathroom. Take a look at how we completed our project on a budget:
Here is our bathroom after it had been gutted….
Sorry, for some reason I didn’t take any true BEFORE pictures {now, I’m mad}!
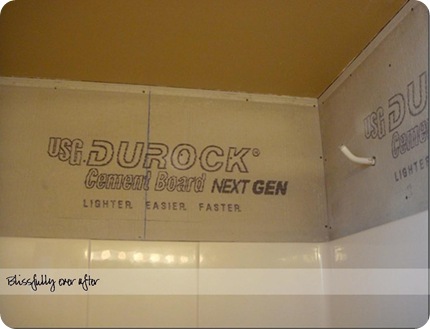
Here my Hubby is removing the drywall to install cement board above the shower
Cement board installed
Starting to tile….
Shower tile complete! We chose subway style tiles with a decorative border. What do you think?
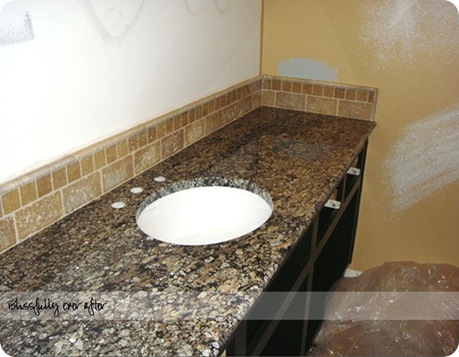
Here is a pic of the cabinet base painted black {using BEHR paint/primer in one in semi-gloss}, granite countertop installed {we used a remnant piece from a local installer and this only costs us $500 for the granite and installation!!}, under mount sink, and tile bask splash. We also removed our large builder mirror and took it down to a local glass cutting store to have them cut it a little and clean up the edges. This costs us only $20 and was well worth it!
The Hubbs installed a new energy efficient vent fan w/ light. Costs was around $60. We went with a very quite model because out last fan was so loud it sounded like a jet airplane every time we turned it on.
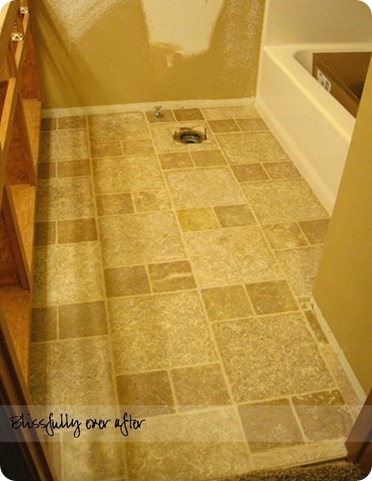
Here is out tile floor installed. My Hubby laid cement board over the existing laminate flooring before laying down the tile. We used a Microban mortar for all areas we tiled to prevent mold and moisture intrusion. We also used an epoxy grout which is the best you can use to keep out moisture, mold, etc.
Here are the walls spackled and ready for some primer/paint. DO you like how the last family didn’t paint behind the toilet? Hot, right?! Oh, I almost forgot to share that we installed a new window for the bathroom as well. Our old window was an octagon shape and didn’t open. My Hubby framed out the window and installed the new one which now opens and has a built in design so people cannot see in.
Showing some love
Ok, are you ready to see some AFTER photos?
Here they are….


We made custom moldings for the mirror using trim from Home Depot that I painted black using the same paint as I did on the cabinets.
Bye bye builder mirror!
We used existing lighting for our master bath and painted the frame black and then installed new energy efficient bulbs. Love the new look!
Cost= $0
Cabinets painted black and new knobs/pulls installed. Knobs are from Hobby Lobby using 40% off coupons and pulls are from Lowe’s. Don’t you love the beaded accent!
New faucet I found online from Amazon for $50!!! Can you believe it! Similar designs at Lowe’s and Home Depot were around $200. Score! Plus, all of the inner piping for this faucet is copper…not plastic, which makes a big difference in quality. Make sure to check Amazon for reputable sellers/dealers to find a great deal!
Countertops….ahhhhhhh love!
Custom/homemade Damask {fabric is from Joann’s using a 50% coupon} curtains on a Fleur De Lis rod and small ring clips I found at Hobby Lobby using 40% off coupons.
Love these cute square picture frames I found at Michael’s {again using my coupons}! I took some photos my husband has taken, printed them in black and white, and put them in the frames. Total cost $15
Here is our shower faucet I found at Lowe’s and we got it on clearance before this model went out of stock. I love the faucet…seems so spa like! Wait, why is this faucet is my soon-to-be baby boy’s bathroom and not mine?? haha! Oh well, he deserves the best!
Still on the lookout for a plain white shower curtain to add the Damask print at the bottom to match the curtains. Found the brushed bronze curtain rod at Lowe’s…under $10. I already had the ring clips.

We kept our existing toilet that was new and low flow {which saves money/water}. We purchased the brushed bronze toilet handle for a little under $20 from Lowes.
I found these beaded towel hooks at Ace Hardware and we actually were able to use some of our Ace Rewards to get two of them for FREE. It was awesome! I love how the beaded accent matches the cabinet pulls.
OK, this is one of my favorite decor items….it is a cute little topiary bush I found at an antique store for only $5. It fits this space perfectly =)
One last look
ahhhhhhhh, refreshing!
Wow, it feels good to have this space completed…especially before the baby arrives! This was one of our most challenging projects yet, but so worth it! By doing all of the work ourselves {beside the installation of the granite countertops and under mount sink}, we were able to save A LOT of money!!! I know this project came in under $1,000 including $500 for the countertops. So, if you ask me…that is a pretty good deal. Don’t ya think?!?
Breakdown of what we did:
-
Gutted bathroom
-
Installed new vent fan
-
Installed new window
-
Installed new shower tile
-
Installed new granite countertops w/ under mount sink
-
Installed new tile backsplash
-
Painted cabinets black and installed new hardware {including black hinges}
-
Installed new tile flooring
-
Painted bathroom using BEHR paint/primer in one {two coats in Winter’s Day}
-
Put back existing toilet but installed a new toilet handle
-
Put back existing mirror {that had been cut} and added chunky trim
-
Installed an existing light from another bathroom that we painted black
-
Installed new sink and shower faucets
-
RE-installed window, floor, and door trim
-
Put up towel hooks, curtain rod, and custom/homemade curtains
-
Put up inexpensive picture frames with self taken photography
There you have it! Our Bathroom redo!
I hope you have enjoyed the tour. Are you working on any bigger home remodeling projects? If so, please share!
Check out how I Clean & Disinfect my bathroom naturally here!
Thanks Jennifer! You did an awesome job on your bathroom! Thanks os much for sharing it with us today. For more transformations, organizing posts, schedules and more, check out and follow her blog now!
Have a great day!


0 comments:
Post a Comment